Volunteer
From zFairs Contest Management
Volunteers can cover a wide range of tasks for an event but registering as a volunteer on a zFairs site is simple as can be. Below are a few steps to help you get started. If you have any questions about this we recommend you reach out to your site's Staff or Admin users for further direction.
- Navigate to the site you are volunteering for
- Click Create Account at the top or begin filling out your name and email in the fields at the right of the page
- NOTE: Not all sites will have both or either of the above listed options turned on. If you only see one or the other that is perfectly normal and you can just use what you have available.
- Click on the Volunteer user type to begin creating a Volunteer user
- NOTE: Site Staff & Admin users have the ability to change the title of the Volunteer Role. You may need to get clarification on which user type to register as if you don't see the appropriate one in the list.
- Walk through the form answering all of the required questions on all of the pages (typically 3 or less pages)
- That's it you are now done. Be sure to take note of your username and password (not your email and password) as you will need that to log in again
SRC/IRB Review Board
- This one is a bit different in that you won't be able to add yourself to these review boards. You'll need to reach out to a Staff or Admin user on the site and have them get you added but once you do you'll see a new menu option appear at the top of the page titled Review or Paperwork. Once added to the appropriate board you can follow these steps to review paperwork.
- Navigate to the Paperwork Review page (Sometimes just titled Review)
- Search for, Filter, or Scroll down the page to identify the project you would like to review.
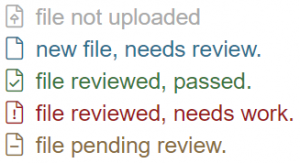
- Note that files for each project will be outlined in various colors. Here is the list of what those mean:
- Gray - File not uploaded
- Blue - File uploaded but not reviewed
- Green - File Uploaded, Reviewed and Approved
- Red - File Uploaded, Reviewed and Needs Work
- Yellow - File Uploaded, Reviewed Previously but now again ready for review
- NOTE: Expected flow of documents is from Gray -> Blue and then to either Green or Red. Files marked as Needs Work / red will then bounce back and forth between Yellow and Red as they get follow up uploads, corrections and reviews until finally they are approved and turned Green.
- Click on a file you would like to review
- Review the file in the pop up window
- On the pop up page you can review all past comments by clicking on the View Comments button in the top right
- Enter any Comments you have for the student or Student's Teacher
- Select the desired new status from the Review Status dropdown
- Click Submit Review
